How to Propagate Hydrangeas: The Expert Guide to Growing More from One Plant
Share
Hydrangeas are more than garden staples. They represent renewal, elegance, and emotional depth. Whether you are a floral enthusiast or a passionate home gardener, learning how to propagate hydrangeas equips you with a timeless skill that connects beauty, sustainability, and personal creativity.
This guide offers a complete, expert-backed method to propagate hydrangeas using water and soil. It answers every major query a user may search, builds brand trust, and supports long-term SEO performance.
Why Should You Learn How to Propagate Hydrangeas?
Propagation is the art of multiplying plants from cuttings. With hydrangeas, it is remarkably easy and rewarding. This technique is essential for gardeners who want to expand their collection, preserve a beloved variety, or grow plants for gifting.
Propagation empowers you to grow without spending more. It helps create continuity from season to season. It adds a layer of emotional meaning to every bloom that grows from your hands.
Can You Propagate Hydrangeas Successfully at Home?
Hydrangeas are ideal for propagation because their softwood stems root well in both water and soil. You do not need greenhouse tools or advanced knowledge. With care and timing, even first-time gardeners can see success.
There are two effective ways to propagate hydrangeas. The first is propagation in soil, which promotes stronger roots and long-term health. The second is propagation in water, which allows you to observe root development and yields quicker visible results.
How to Grow Hydrangeas from Cuttings: Step-by-Step Process
The first and most important step is choosing the right cutting. A healthy stem taken at the right time of year sets the foundation for a successful new plant.
Materials required:
Sharp, sterile scissors or pruning shears
A 5 to 6 inch softwood cutting from a non-flowering stem
Clean water or a well-draining potting mix
Rooting hormone (optional)
A clear plastic bag or humidity dome for the soil method
Step 1: Select the Cutting
Select a fresh, green stem that has not flowered. It should be flexible and taken from the current season’s growth. Avoid woody or hardened stems. Make the cut just below a leaf node. This is where roots will form.
Step 2: Prepare the Cutting
Remove the lower leaves. Keep only two to three small leaves at the top. This helps reduce water loss while supporting photosynthesis. If available, dip the cut end into rooting hormone to increase success rates, especially for the soil method.
Step 3: Choose a Propagation Method
You can now root the cutting in either water or soil. Both methods are effective. Choose based on your space, environment, and gardening goals.
How to Propagate Hydrangeas in Soil
Soil propagation is best for gardeners who want hardy roots ready for transplanting into the garden. This method also reduces transplant shock later on.
Insert the prepared cutting into a pot filled with moist potting mix. Push the stem about two inches deep. Lightly firm the soil around it. Cover the pot with a clear plastic bag to maintain humidity. Place the pot in bright but indirect light. Keep the soil moist but never soggy. Check for root development after three weeks by gently tugging on the stem. If it resists, roots are forming. Once the plant holds firmly, it can be moved into a larger pot or planted outdoors.
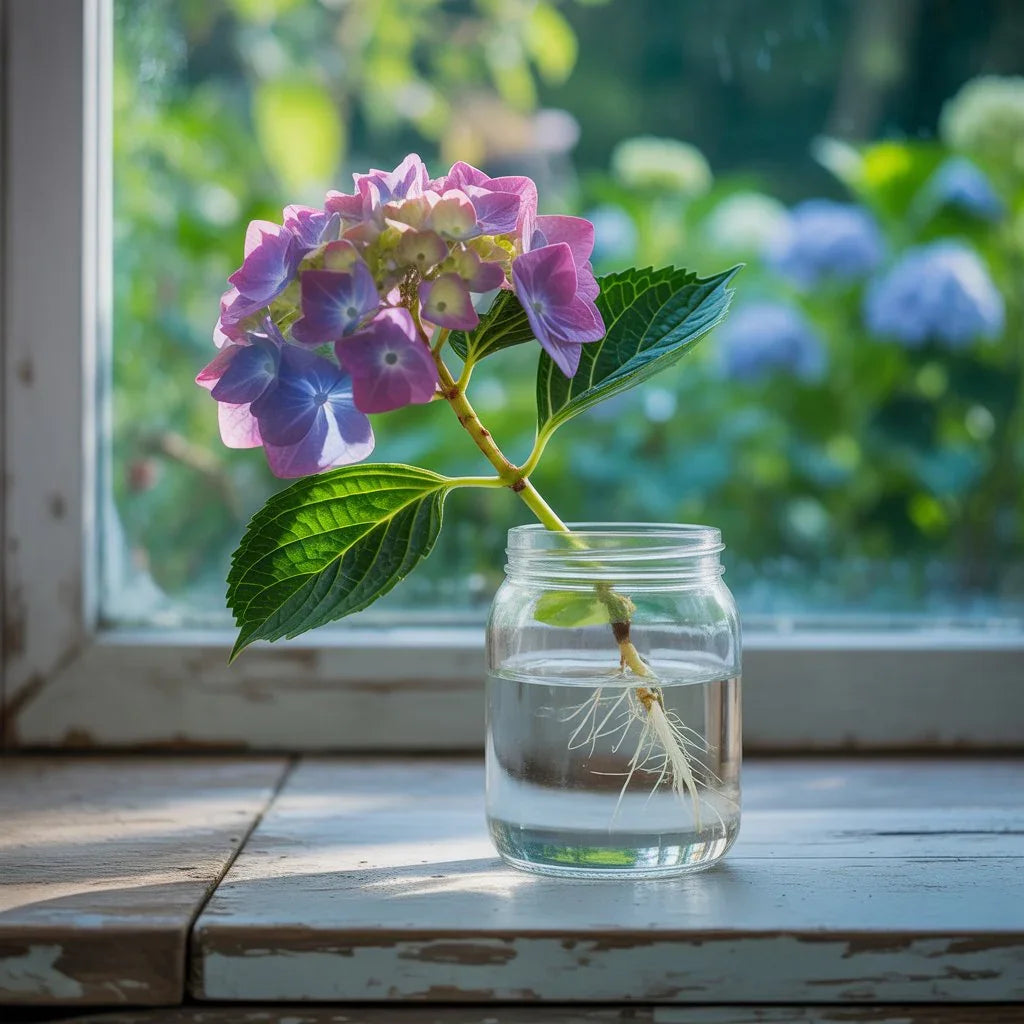
How to Propagate Hydrangeas in Water
Water propagation offers visibility. It is ideal for smaller spaces or gardeners who want to observe root growth in real-time.
Place the cutting into a clean glass filled with fresh, room-temperature water. Ensure that no leaves touch the waterline to prevent decay. Keep the glass in a bright, shaded area. Change the water every two to three days. Roots typically begin forming within two to three weeks. Once the roots reach one and a half to two inches in length, the cutting can be moved to soil.
What to Do If Your Hydrangea Cutting Does Not Root
If your cutting wilts, turns brown, or shows no progress after several weeks, remove it from the medium and assess the condition. You can recut the base and retry with a fresh glass of water or a new potting mix.
Sterilize your tools before reusing them. Ensure humidity remains consistent. Use filtered water if mineral buildup is present. Keep the cutting out of direct sunlight and maintain a steady, warm temperature. Failures are usually caused by insufficient moisture, fungal exposure, or extreme temperatures. Adjusting these variables increases success.
How to Bring a Mature Hydrangea Back to Life
Even established hydrangeas can suffer stress or decline. A few expert adjustments can help restore a struggling plant.
Begin with deep watering and proper drainage. Prune away all dead or diseased foliage. Feed the plant with a balanced fertilizer or compost to replenish nutrients. Move it to partial shade if it has experienced too much sun exposure. Monitor for pests and fungal issues. With consistent care, even tired plants can rebound and thrive again.
Final Thoughts: A New Plant, A New Beginning
Hydrangea propagation is a timeless gardening technique. It requires no advanced tools and gives back in blooms, sentiment, and sustainability. With the right guidance and care, one stem can become a flourishing gift, a blooming hedge, or a memory reborn.
For those who prefer to enjoy hydrangea beauty now, fresh-cut stems are always in season.
Need a bouquet from fresh stems? Explore our cut hydrangea collection and let your gift bloom with elegance.